ATutor
Learning Management System
AContent LTI and Live Linking into ATutor
This tutorial describes how to link AContent learning materials into ATutor, keeping the materials in AContent but displaying them in ATutor as if it were native ATutor content. ATutor version 2.1 and AContent version 1.3 are required. There are two ways to link content into ATutor.
- Live linking via the AContent Search Tool
- LTI Link AContent Materials via External Tools Utility
Live Linking Content into ATutor via the AContent Search Tool.
Initial AContent Setup
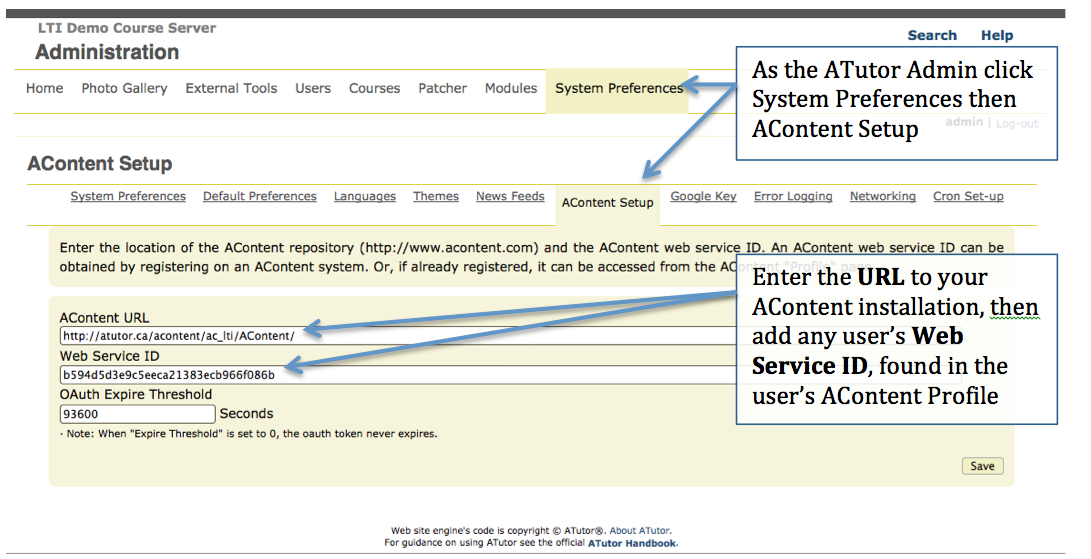
Before attempting to live link AContent learning materials into ATutor, ATutor must first be configured to find those materials in AContent. In the System Preferences area of the ATutor administrator tools, enter the AContent URL pointing to the base directory of the AContent installation (e.g. http://mysite.com/AContent/), and enter a Web Service ID. This ID is found in AContent by logging in as any user on the system and opening the Profile for that user. Copy the Web Service ID from the profile into the ATutor AContent Setup form. Adjust the OAuth Expire Threshold if needed to set the timeout for sessions between ATutor and AContent.
Adding Live Linked Content to ATutor
To live link AContent materials into an ATutor course:
- Login as a course's instructor then open the Manage Tab, click on AContent in the Content manager links to open the AContent search tool.
- Enter a keyword into the search tool and press the Search button. The keyword "create" will find the default content supplied with a new AContent installation, or enter other keywords associated with other materials that may have been created or added to AContent.
- In the results that appear click on the Live Link icon (
 ) to open the Import screen. Note the other two icons are to download a zipped Content Package (
  ) or download a zipped Common Cartridge (
  ).
). - On the Import screen choose from the "Import into:" field the location where you want the content to be linked in.
- Press the Import Button.
- Done. The content you just linked should now appear in the Content Navigation menu to the side of ATutor.
Live linking materials from AContent into ATutor creates a Common Cartridge Weblink for each of the pages you've linked to. If you export the content in Common Cartridge format, the live links to your AContent learning materials will be maintained in the cartridge, and can be exported from ATutor and imported into other systems that support common cartridge or into other ATutor courses. You may edit the links, remove any you don't need, or rearrange them throughout the content of the course after live linking.
LTI Linking AContent Materials via ATutor External Tools Utility
AContent can be added to ATutor, and to other LTI compliant systems, as an externally linked LTI based tool. Basic linking as an external tool is possible for all LTI based consumer applications. ATutor extends that default LTI provider functionality, adding the ability to link specific content pages from AContent into ATutor using the LTI based search tool available when the AContent External Tool is used when creating or modifying ATutor content.
There are two ways to create an LTI External Tool in ATutor, either by the ATutor administrator as a system wide tool available to all content authors (instructors), or as a course specific tool created by a course instructor. Both methods are similar though the admin has additional options that can be set, delegating various settings when a system wide tool is created to instructors. The instructor method is described here.
Create an AContent LTI External Tool
To create an external tool as an instructor use the following steps.
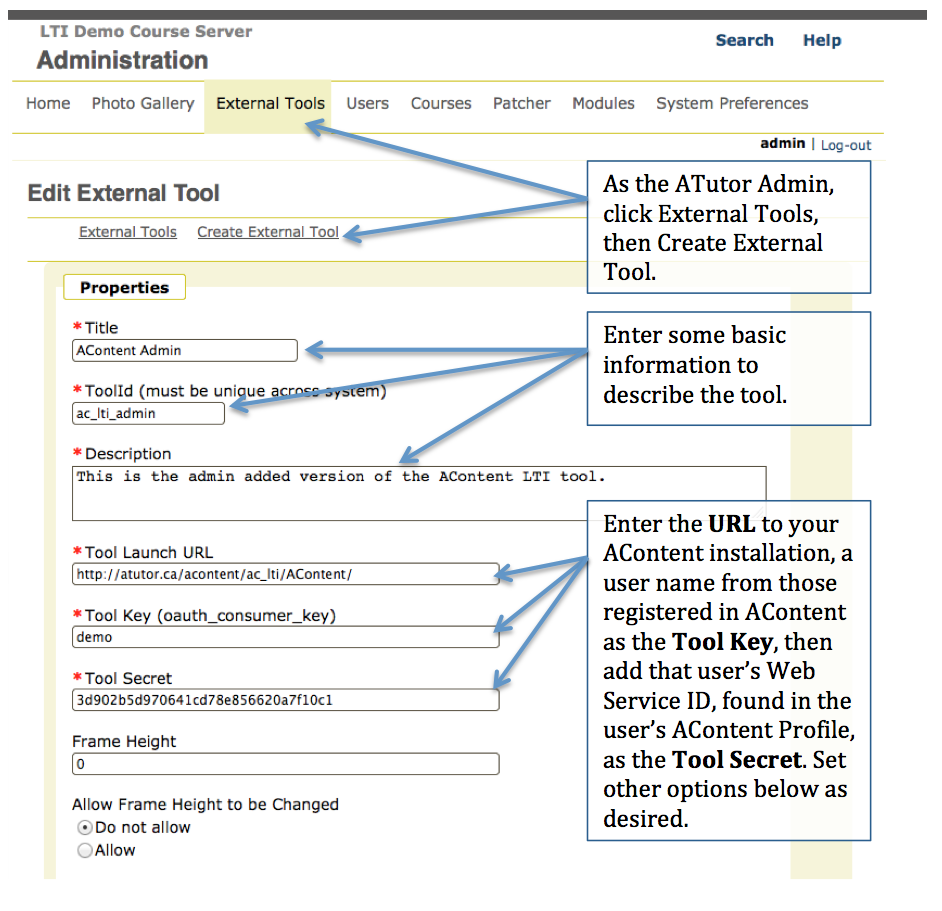
- While in a course as its instructor, click on the Manage tab, then open the "Create External Tool" link in the External Tools section.
- In the form that appears, give the tool a meaningful title.
- Create a ToolId. This can be any string (without spaces or special characters) but it must be unique on the ATutor system to which the tool is being added.
- Enter a description for the tool. A few words are required to describe the tool.
- Enter the Tool launch URL. This is the URL to the base directory of the AContent installation you are linking to (e.g http://mysite.com/AContent/)
- Enter the Tool Key. This is a username for any user registered on the AContent system being linked to.
- Enter the Tool Secret. This is the Web Service ID for the user describe in the previous step, found on that user's AContent Profile page.
- Adjust additional settings as required. See the ATutor Handbook page for "Create External Tool", linked from the upper right of the form for a description of optional settings.
- Press the Save button to create the tool.
- Done.
Linking AContent LTI Tool Content into ATutor
Now that the AContent External Tool has been created, it becomes available to the ATutor Content Editor. From there AContent can be searched and content pages can be added to the ATutor content much like live linked content is, described above. To add AContent content to a course follow these steps.
- While in a course as it's instructor, open the ATutor Content Editor. There are various ways to get to the content editor, one way is by opening the Manage Tab then clicking "Create" in the Content manager area.
- First insert a Title and press Save to generate a folder into which the linked content will be added. Once saved, that title should appear in the Content Navigation menu to the side.
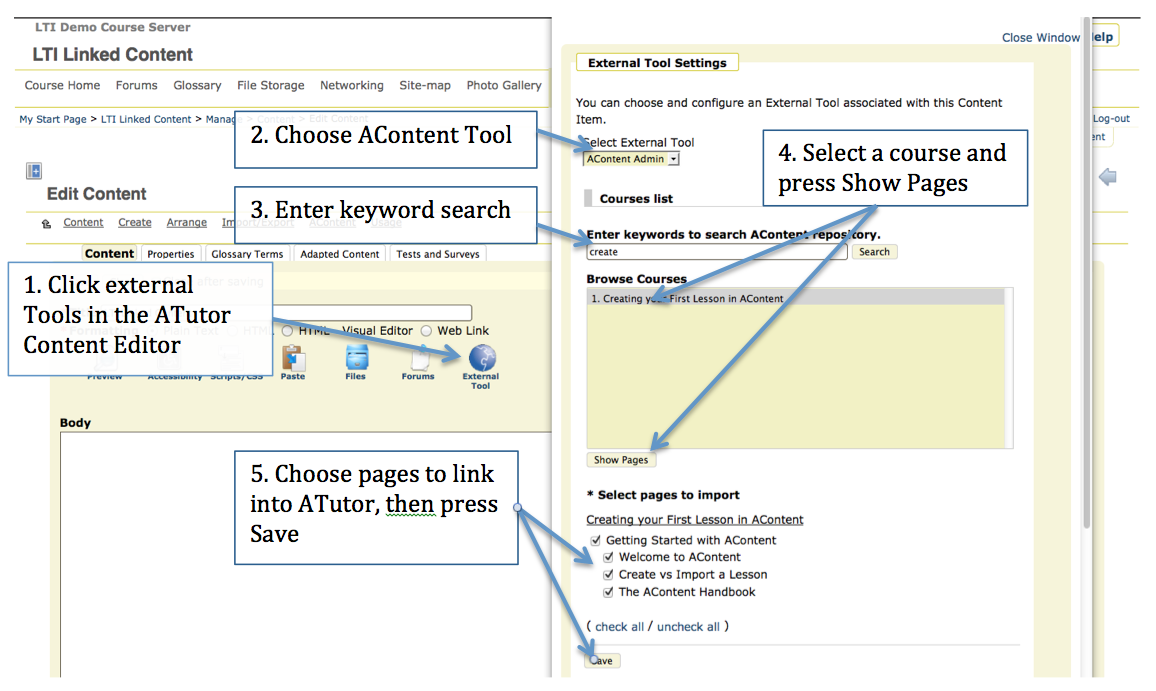
- Click on the External Tool icon in the Content Editor to open the External Tool Settings window.
- Choose from the Select External Tool menu, the AContent tool that was created in the "Create External Tool" steps above.
- After selecting the AContent tool from those listed in the menu, a search tool should appear below. Enter a search term to find the content in AContent that you wish to link into ATutor, and then press the Search button. Using the word "create" will find the default content provided with each AContent installation, or use other terms.
- The titles of courses or content units that contain these search terms will appear in the Browse Courses area below the search filed. Choose one of the results then press Show Pages to generate a list of pages in the course or content unit being viewed.
- From the pages listed after pressing Show Pages, choose those that you wish to link into your ATutor content and press Save to link those pages into ATutor.
- After pressing the Save button Press Close Window to complete the linking.
- Finally, now back on the Content Editor, check the "Close after Saving" checkbox and press Save.
- Done. The content linked into ATutor can now be rearranged in necessary, or content not needs can be removed.
Like Live Linking content described above, linking via the AContent LTI tool creates Common Cartridge Weblinks. If content is exported in Common Cartridge format, the links to the external content will be maintained in the Common Cartridge.